Arduino Android Interfacing – Example Code and Troubleshooting
Mobile phones playing key role in our day to day life, when Google presented Android to the world and aimed to make every phones smart the mobile industry started growing and today even a low end mobile is a smart phone. In this smartphones era hardware interfacing and automation using smart phones is emerging.
The future is in Artificial intelligence, your smart phones are really becoming smart day by day. In this article we will see how to interface Arduino with Android Smart phone. We will divide this article into three sections
Arduino circuit diagram, Arduino code and Android code.
How Arduino-Android interfacing using HC 05 Works ?
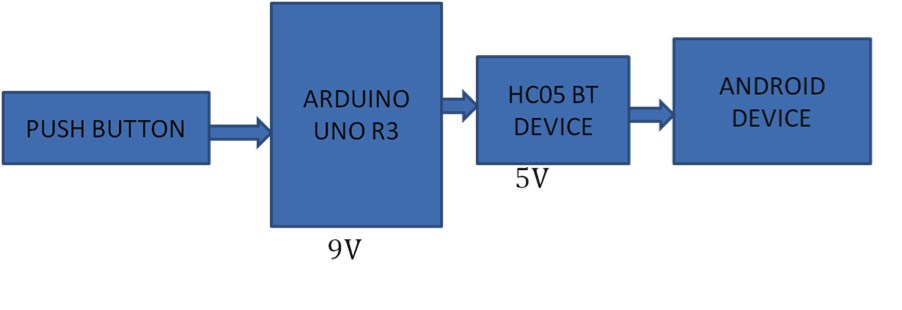
After doing proper connections and both Android and HC 05 bluetooth module are paired. The android code will infinitely keep listening to incoming data from HC05 bluetooth module. When a button is pressed in which is connected to Arduino a data will be sent from HC05 to android. android code will read the incoming data.
Devices and Softwares needed :
- HC – 05 Bluetooth module
- Arduino Uno R3
- Breadboard and Jumper wires
- Arduino IDE
Block diagram for Arduino-Android interfacing

Arduino Circuit Diagram –
Connection details :
HC – 05 GND ————> Arduino GND Pin
HC – 05 VCC (5V) ————> Arduino 5V
HC – 05 TX ————> Arduino Pin 10 ( soft RX )
HC – 05 RX ————> Arduino Pin 11 ( soft TX )
HC – 05 Key (Pin 34 ) ————> Arduino Pin 9


Arduino Code :
#include
SoftwareSerial mySerial(10,11);
int button=9;
int buttonState=0;

void setup() {
    mySerial.begin(38400);
    pinMode(button,INPUT_PULLUP);
}

void loop() {
  buttonState=digitalRead(button); //Reads data when button is pressed

 if(mySerial.available())
    Serial.write(mySerial.read());
 if (buttonState==LOW) {
     mySerial.write("1"); //Send data 1 to Android.
     delay(500);
  }
}
Android Code :
Declare necessary variables
/*Adapter helps to get a handler for device object which can be used to communicate with Bluetooth module*/
private BluetoothAdapter btAdapter = null;
/* Socket is used to connect and to get output/input streams to write/Read data To/From Bluetooth module */
 private BluetoothSocket btSocket = null;

/* Output stream used to send data to Bluetooth module
 private OutputStream outStream = null;

/* input stream used to read data from Bluetooth module */
 private InputStream inStream;

// UUID is used as a key to connect to the device
 private static final UUID MY_UUID = UUID.fromString("00001101-0000-1000-8000-00805F9B34FB");

// Insert your server's MAC address
 private static String address = "00:00:00:00:00:00";
protected void onCreate(Bundle savedInstanceState) {
     super.onCreate(savedInstanceState);
      btAdapter = BluetoothAdapter.getDefaultAdapter();
      checkBTState();
       runnable = new Runnable() {
          @Override
           public void run() {
             //Create a thread which infinitely listen to the incoming data
               listen();
            }
        };
       thread = new Thread(runnable);
  }
@Override
 public void onResume() {
   super.onResume();
  // Set up a pointer to the remote node using it's address.
   BluetoothDevice device = btAdapter.getRemoteDevice(address);
 // Two things are needed to make a connection:
 //   A MAC address, which we got above.
 //   A Service ID or UUID.  In this case we are using the
 //     UUID for SPP.
   try {
      btSocket = device.createRfcommSocketToServiceRecord(MY_UUID);
    } catch (IOException e) {
        errorExit("Fatal Error", "In onResume() and socket create failed: " + e.getMessage() + ".");
    }
  // Discovery is resource intensive.  Make sure it isn't going on
  // when you attempt to connect and pass your message.
   btAdapter.cancelDiscovery();
  // Establish the connection.  This will block until it connects.
  try {
       btSocket.connect();
    } catch (IOException e) {
   try {
        btSocket.close();
     } catch (IOException e2) {

    }
 }
// Create a data stream so we can talk to server.
 try {
     outStream = btSocket.getOutputStream();
     inStream = btSocket.getInputStream();
      thread.start();
 } catch (IOException e) {
 }
}
//Run listen in different thread
 public void listen() {
    // Keep listening to the InputStream until an exception occurs
    while (true) {
        try {
           // Read from the InputStream
           byte buffer[];
           buffer = new byte[1024];
           //Read is synchronous call which keeps on waiting until data is available
           int bytes = inStream.read(buffer);
            if(bytes > 0){
              /*If data is non zero which means a data has been sent from Arduino to
               Android */
             //Do your stuff here
           }
     } catch (IOException e) {
        break;
    }
  }
 }
private void checkBTState() {
    // Check for Bluetooth support and then check to make sure it is turned on
    // Emulator doesn't support Bluetooth and will return null
    if (btAdapter == null) {
    } else {
  }
 }
 }
private void sendData(String message) {
    byte[] msgBuffer = message.getBytes();
    try {
      outStream.write(msgBuffer);
     } catch (IOException e) {
        String msg = "In onResume() and an exception occurred during write: " + e.getMessage();
     if (address.equals("00:00:00:00:00:00"))
             msg = msg + ".\n\nUpdate your server address from 00:00:00:00:00:00 to the correct address on line 37 in the java code";
        msg = msg + ".\n\nCheck that the SPP UUID: " + MY_UUID.toString() + " exists on server.\n\n";
         errorExit("Fatal Error", msg);
    }
 }

App Manifest file :
Download Manifest file here : Link
Troubleshooting Arduino HC 05:
There are many issues you might face and the troubleshooting techniques are as follows. 1. Some times Android and HC 05 will not connect ( android btSocket.connect();) might fail In this case unpair your HC 05 from android mobile and restart your Arduino(power off and power on). Pair again with android. If this doesn’t work then restart your mobile phone. 2. Some times android reads junk data even though data is not sent from HC 05. In this case also do the same stuff as described in above point. You can find many examples in – http://www.instructables.com
Project done by :
1. Vidya
2. Savitri
3. Shabnam
4. Niharika
Basaveshwar Engineering College – Bagalkot
Hi, the code is unable to connect the arduino to Android via bluetooth. :/
Hi try troubleshooting
1. unpair ur bluetooth module first
2. switch off ur mobile
3. disconnect power pin from ur micro controller
4. restart mobile and reconnect microcontroller
5. pair ur HC05
run the app