React-16 + Material-UI v4.10.X CSS not loading issue in Server Side Rendering

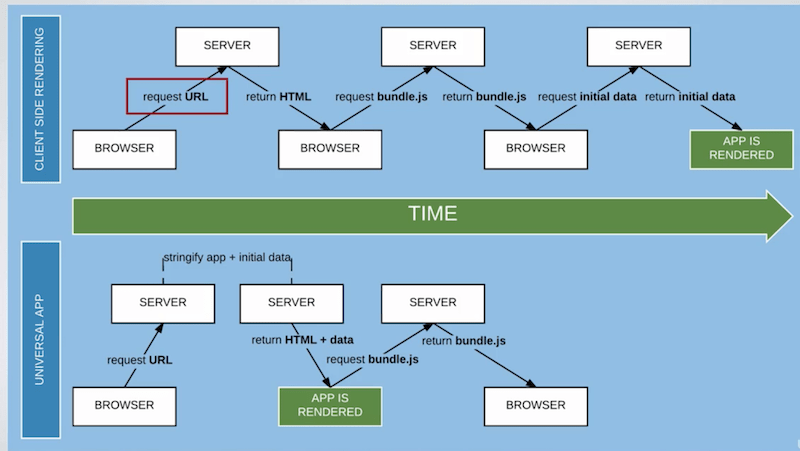
Server side rendering in React 16 is always a tricky, it behaves different than client side rendering. One of the typical issue we face for SSR apps is CSS not loading and images are not rendering.

Interesting observations are CSS are being rendered properly in landing page, however in any other routes CSS are missing. This issue is very obvious when we are using Material-ui library. In every new release Material-UI is making drastic changes and hence its being little tough to upgrade library.

The complete Code for Server Side Rendering in React16 and Material-UI is here

For CSS not loading in SSR app another mistake could be not referring to your build folder in server side code, hence kindly first check below article to make necessary changes which is mandatory.

CSS & Images not loading in React SSR App

However to support Material-UI v4.10.x we need to change two files in the code given in above link. We have to change request handler and App.js “<Provider> part”

Here is the updated code given below

requestHandler.js File Changes

'use strict';

import React from 'react';
import { Provider } from 'react-redux';
import thunk from 'redux-thunk';
import { applyMiddleware, createStore } from 'redux';
import { renderToString } from 'react-dom/server';
import { ServerStyleSheets, ThemeProvider, createMuiTheme } from '@material-ui/core/styles';

// import JssProvider from 'react-jss/lib/JssProvider';
import path from 'path'
import fs from 'fs'
// import {
//   MuiThemeProvider,
//   createMuiTheme,
//   createGenerateClassName,
// } from '@material-ui/core/styles';
import green from '@material-ui/core/colors/green';
import red from '@material-ui/core/colors/red';
import { StaticRouter, matchPath } from 'react-router-dom';
import DocumentMeta from 'react-document-meta';
import reducers from '../Reducers';
import routes from '../Routes';
import routesConfigs from './routesConfig';

const middleware = applyMiddleware(thunk);

// const escapeRegex = /([[\].#*$><+~=|^:(),"'`\s])/g;
// let classCounter = 0;

// export const generateClassName = (rule, styleSheet) => {
//   classCounter += 1;

//   if (process.env.NODE_ENV === 'production') {
//     return `c${classCounter}`;
//   }

//   if (styleSheet && styleSheet.options.classNamePrefix) {
//     let prefix = styleSheet.options.classNamePrefix;
//     // Sanitize the string as will be used to prefix the generated class name.
//     prefix = prefix.replace(escapeRegex, '-');

//     if (prefix.match(/^Mui/)) {
//       return `${prefix}-${rule.key}`;
//     }

//     return `${prefix}-${rule.key}-${classCounter}`;
//   }

//   return `${rule.key}-${classCounter}`;
// };

function renderView(req, res, state) {
  const sheets = new ServerStyleSheets();
  // Create a theme instance.
  const theme = createMuiTheme({
    palette: {
      primary: green,
      accent: red,
      type: 'light',
    },
  });

  // STEP-1 CREATE A REDUX STORE ON THE SERVER
  const store = createStore(reducers, state, middleware);
  // const sheetsRegistry = new SheetsRegistry();
  // Create a sheetsManager instance.
  // const sheetsManager = new Map();
  //commented below and using the function pasted above to solve css problem in sidebar and for buttons component
  // const generateClassName = createGenerateClassName();
  // STEP-2 GET INITIAL STATE FROM THE STORE

  const initialState = JSON.stringify(store.getState()).replace(/<\/script/g, '<\\/script').replace(/<!--/g, '<\\!--');
  // STEP-3 IMPLEMENT REACT-ROUTER ON THE SERVER TO INTERCEPT CLIENT REQUESTs AND DEFINE WHAT TO DO WITH THEM
  const context = {};
  
  const reactComponent = renderToString(
    sheets.collect(
    // <JssProvider generateClassName={generateClassName}>
      <ThemeProvider theme={theme}>
        <Provider store={store}>
          <StaticRouter
            location={req.url}
            context={context}>
            {routes}
          </StaticRouter>
        </Provider>
      </ThemeProvider>
      ),
    // </JssProvider>
  );
  // const css = sheetsRegistry.toString()
  const css = sheets.toString();
  const reactMetaComponent = DocumentMeta.renderToStaticMarkup();
  if (context.url) {
    // can use the `context.status` that
    // we added in RedirectWithStatus
    redirect(context.status, context.url);
  } else {
    //https://crypt.codemancers.com/posts/2016-09-16-react-server-side-rendering/
    //res.status(200).render('index', { reactComponent, reactMetaComponent, initialState });
    fs.readFile(path.resolve('build/index.html'), 'utf8', (err, data) => {
      if (err) {
        return res.status(500).send('An error occurred')
      }
      const replacedData = data.replace(
        '<div id="root"></div>',
        `<div id="root">${reactComponent}</div>
        <style id="jss-server-side">${css}</style>
        <script>
          window.INITIAL_STATE = ${initialState}
        </script>`
      );
      const replacedMetaTagData = replacedData
        .replace(`<meta id="reactMetaTags"/>`,
          `${reactMetaComponent}`);
      res.send(replacedMetaTagData);
    })
  }
}

function handleRender(req, res) {
  // filter matching paths
  // and check if components have data requirement
  const components =
    routesConfigs.filter(route => matchPath(req.path, route))
      .map(route => route.component);
  if (components.length > 0 && (components[0].fetchData instanceof Function)) {
    components[0]
      .fetchData(req.query, req.path)
      .then((response) => {
        renderView(req, res, response);
      })
      .catch((error) => {
        try {
          console.log('--- ssr render error --- ', error);
        } catch (e) {
          console.log('--- ssr render error catch--- ', e);
        }
        renderView(req, res, {});
      });
  } else {
    renderView(req, res, {});
  }
}

module.exports = handleRender;

Observe that we removed using JssProvider , generateClassName, Stylesheet Manager etc. The latest changes are much simpler

App.js file changes

import React, { Component } from 'react';
import thunk from 'redux-thunk';
import { Provider } from 'react-redux';
// import JssProvider from 'react-jss/lib/JssProvider';
// import {
//   MuiThemeProvider,
//   createMuiTheme,
//   createGenerateClassName
// } from '@material-ui/core/styles';
import { ThemeProvider, createMuiTheme } from '@material-ui/core/styles';
import { applyMiddleware, createStore } from 'redux';
import { BrowserRouter } from 'react-router-dom'
import green from '@material-ui/core/colors/green'
import red from '@material-ui/core/colors/red';
import Routes from './Routes';
import reducers from './Reducers';

const middleware = applyMiddleware(thunk);
const initialState = window.INITIAL_STATE;
const store = createStore(reducers, initialState, middleware);

// Create a theme instance.
const theme = createMuiTheme({
  palette: {
    primary: green,
    accent: red,
    type: 'light',
  },
});
// const generateClassName = createGenerateClassName();

class App extends Component {
  componentDidMount() {
    //Not required to remove css since it is already came from sssr
    // const jssStyles = document.getElementById('jss-server-side');
    // if (jssStyles && jssStyles.parentNode) {
    //   jssStyles.parentNode.removeChild(jssStyles);
    // }
    const jssStyles = document.querySelector('#jss-server-side');
    if (jssStyles) {
      jssStyles.parentElement.removeChild(jssStyles);
    }
  }
  
  render() {
    return (
      <Provider store={store}>
        <BrowserRouter>
          {/* <JssProvider generateClassName={generateClassName}> */}
            <ThemeProvider theme={theme} >
              {Routes}
            </ThemeProvider>
          {/* </JssProvider> */}
        </BrowserRouter>
      </Provider>
    );
  }
}

export default App;

Again we no need to use JssProvider in client side as well.

These changes will solve the issue.

Platform Architecture in Computer Science: Caching and File Storage

One of the important aspect of any platform is performance, to increase the performance to satisfy end users with quick access one can not escape from in memory cache. Database operations are always costly, executing complex queries to meet real time needs will make the entire platform slow. For faster access, in-memory cache is very much needed. People use Radis and Kafka.

Before reading further I recommend reading my previous article on platform architecture

Caching in platform Architecture

Now interesting question is where do Caching service fits in my architecture? How do we represent it in platform architecture and where do we integrate caching?

Typically we should have a cache manager within the app which manages caching and database. For any request first we have to check whether required data is in cache ? if not then only hit Database else return from cache.

In case of data update or new insertions , the cache manager has to take care of updating the cache and then make the updated data available for further read operations.

The updated platform architecture looks as follows now

Platform architecture with caching

Redis or Kafka are well known services for in-memory cache, but both have their own purpose, so we have to decide upon what to use when ?

Read more about Redis

File Server for file storage in platform architecture

I thought of covering this also in the same article as it is a small but very important to consider. Because lot of developers have confusion regarding where to store files ? many people will create a folder in their application server and store all files there itself, which is a very wrong for ay real-time applications.

It is recommended to store files in file servers like Amazon AWS S3 bucket and Google Storage, if its publicly sharable multimedia file like image or video then go for Cloudinary kind of CDN services.

Why not to store files in application server?

  1. Application servers like amazon EC2 or Google App engine are not made for file storage, their purpose is to run your app
  2. Application servers are compute engines where you can install any software whichever you need for you app to run in cloud, where as file servers are just providing the storage to store huge files
  3. File servers have different qualities altogether they can take you files backup, create replica if needed, they are capable to transfer huge data fast enough, they are cheaper than app servers
  4. in case of app servers, for some reason if something goes wrong, u may need to create new server quickly and release your app again, if your all file data is also stored in the same server you may loose it permanently, but file server are more reliable for that matter
  5. This is what amazon claims -> Amazon S3 is designed for 99.999999999% (11 9’s) of data durability because it automatically creates and stores copies of all S3 objects across multiple systems.
  6. File servers also provide other services like securing files through authorised access, encrypt the files
  7. Manage and access control – you can create multiple folders and access each folder for specific service so that other services won’t get access to it
  8. File servers like Amazon S3 provide services like querying on the data stored in files, all such nice features you won’t get it in app servers because they are not meant for it

Platform Architecture in Computer Science: Case Study on Various Platforms

Before reading this article, I strongly recommend reading my previous two articles.

Platform Architecture with Multiple Apps Approach

Platform Architecture with Micro-Service Approach

Despite all of these inputs, I am still saying platform architecture depends upon various needs of the platform, hence there is nothing like one standard way, it will be always evolving. Hence let us look into some of the references for Highly Scalable Platform Architectures to understand even better

  1. Linked in Architecture – Reference – Click Here

Observe here, a separate replica set for Database ?

  1. Uber Architecture – Reference Click Here

Uber has a micro-service architecture.

  1. Netflix Architecture – Reference Click Here

Netflix architecture looks very complex and it is micro-service architecture

Some highlights of Netflix Architecture, Hundred’s of microservices and one giant service. thousand’s of servers spread across the world, thousand’s of Content Delivery Networks, Netflix uses their own CDN called Open Connect

  1. 100s of microservices
  2. 1000s of daily production changes
  3. 10,000s of instances running in AWS cloud
  4. 10, 000, 000, 000 hours of streamed

This is how it looks 🙂

Reference: How Netflix works: the (hugely simplified) complex stuff that happens every time you hit Play

  1. Ebay Architecture

Read More on Platform Architecture

Thank You

Platform Architecture in Computer Science: Different approaches and Benefits

What is Platform Architecture in Computer Science

A platform architecture is an abstract high level design of the platform that answers to some of the key important factors of any platform like scalability, resilience, maintainability. It should cover almost all important big modules, multiple apps, all the servers, databases, caching, third party solutions and etc.

A platform should be ever evolvable, should be able to adopt to the new changes and needs of the platform and it helps to meet all technical and operational requirements with focus on optimising performance and security.

Desirable Properties of Platform Architecture

  1. High level of Abstraction – It should be simple enough and comprehensive enough to get high level of understanding
  2. Resilient – Each major module (app) should not be get affected so much due to one defective app
  3. Scalable – Architecture should consider the scalability of the platform “Scalability” refers to the number of users, sessions, transactions, and operations that can be accommodated by the entire system
  4. Maintainable – Should be able to make changes to any part of the system without breaking or damaging too much to other parts
  5. Ever Enhancing – it should be able to evolve every-time when there is a need of change

Important Aspects to focus on while designing platform architecture.

  1. How many servers we need to maintain, is it per app level or every major functionality
  2. How caching is handled in platform
  3. API Gateways for API security, metering, throttling
  4. Searching functionality within the platform
  5. Users and Identity Management
  6. Security
  7. Databases
  8. File Servers
  9. Third Party Services if any
  10. Data query and Manipulation for faster data access like using GraphQL
  11. Communication between each apps or each servers using event queue, event bus or intermediate app whichever way it is
  12. Handling batch processes using cronjobs or cloud functions
  13. Data mining, AI System

For Different Approaches for designing Platform Architectures click here

How Web Servers Work : A Multi Threaded Architecture Video tutorial

In this video tutorial we explain how web servers works, what is multi threaded architecture and limitations of multi threaded web server architecture

Server Side Rendering (SSR) in React 16 with create-react-app using Material Ui, Redux and Express Libraries

What is Server Side Rendering in React (SSR)?

Server side rendering is normally rendering the requested page at server side of client and sending back the whole html page from server.
i.e: Server-side rendering is all about handling the initial render whenever a request hits the server. For more on basics of SSR please read my first article

Let us see how to implement server side rendering in ReactJs

How to Enable Server Side Rendering using React and ExpressJS

Dependencies:

React: 16.7.0
Material Ui Library from Google: v3.9.3
redux: 4.0.1
redux-thunk: 4.0.1
express: 4.17.1
react-jss: 8.6.1
react-router-dom: 4.3.1
react-document-meta: 2.1.2
axios: 0.19.0
@babel/plugin-proposal-class-properties: 7.4.0
@babel/preset-env: 7.4.3
@babel/register: 7.4.4
babel-preset-es2015: 6.24.1

Step1: Create React Application
Create a react app using command create-react-app
Install the create-react-app globally on your machine with below command.

npm install -g create-react-app

Create a project by create-react-app as follows

create-react-app ssr-react-16


Step2: Install necessary npm packages for React server side rendering applicationInstall the following packages by running the following commands, if necessary please use the same version too.

npm install @material-ui/core
npm install  react-redux
npm install redux
npm install redux-thunk 
npm install express
npm install react-router-dom
npm install react-document-meta
npm install react-jss
npm install axios
npm install @babel/plugin-proposal-class-properties
npm install @babel/preset-env
npm install @babel/register
npm install babel-preset-es2015

Thats it now your app is ready with library setup

Step3: babel configs for react server side app
Create a file called .babelrc in root directory of the app and paste the below code.
Babel is a toolchain that is mainly used to convert ECMAScript 2015+ code into a backwards compatible version of JavaScript in current and older browsers or environments. For more you can read the babel doc.

{
  "presets": ["@babel/env", "@babel/preset-react"],
  "plugins": [
    "@babel/plugin-proposal-class-properties"
  ]
}

Step4:
Create a file called www under bin folder which is in root directory
In this file we will be creating a server for client and allocate a port (I am using 5000 here)
Copy the code below to file just created

const app = require('../src/client/src/ssr/clientServer');
const http = require('http');

const port = normalizePort(process.env.PORT || 5000);
app.set('port', port);

const server = http.createServer(app);
server.listen(port);

function normalizePort(val) {
  const port = parseInt(val, 10);
  if (isNaN(port)) {
    // named pipe
    return val;
  }
  if (port >= 0) {
    // port number
    return port;
  }
  return false;
}

In the above code snippet, we are importing a file called clientServer.js that’s covered in the next step.

Step5: ReactJS server side script to initialise server part of client app.
Create a file clientServer.js
For better folder structure, I have organised as shown in the below screenshot where bin and src will falls under root directory. Paste the below code in clientServer file. clientServer is kind of server side script for our client application, it will initiate expressjs and configurations for server side script of client.

require("@babel/register")({
  presets: ["@babel/preset-env"]
});

const express = require('express');
const path = require('path');

const requestHandler = require('./requestHandler');
const app = express();

//static files nd build file reference
app.use(express.static(path.join(__dirname, '../../../../build')));
app.use(express.static(path.join(__dirname, 'public')));

app.set('view engine', 'ejs');
app.set('views', path.join(__dirname, 'public'));

//for server side rendering
app.use(requestHandler);

// catch 404 and forward to error handler
app.use((req, res, next) => {
  const err = new Error('Notdff Found');
  err.status = 404;
  next(err);
});

module.exports = app;


In the above code you can see a requestHandler file, which is very important file and will see there.

Step6: A request handler for ReactJS for server side rendering and invoking (calling) apis at server side
This step is very important for serving the requested page from server side.  All magic of serving the requested page is done in this script.  When client request for a page, it matches the path and determines whether is there any API call for this page and invokes api then updates HTML body for the respective response. Basically here its creating the react component at server side. Hence React component is fully ready with all the data for the first render itself. 
If there is no api call for a particular page, it just serves a just a static page 


Create a file requestHandler.js Copy the below code.

'use strict';
import React from 'react';
import { Provider } from 'react-redux';
import thunk from 'redux-thunk';
import { applyMiddleware, createStore } from 'redux';
import { renderToString } from 'react-dom/server';
import { SheetsRegistry } from 'jss';
import JssProvider from 'react-jss/lib/JssProvider';
import path from 'path'
import fs from 'fs'
import {
  MuiThemeProvider,
  createMuiTheme,
  createGenerateClassName,
} from '@material-ui/core/styles';
import green from '@material-ui/core/colors/green';
import red from '@material-ui/core/colors/red';
import { StaticRouter, matchPath } from 'react-router-dom';
import DocumentMeta from 'react-document-meta';
import reducers from '../reducers/index';
import routes from '../routes';
import routesConfigs from './routesConfig';

const middleware = applyMiddleware(thunk);

function renderView(req, res, state) {

  // Create a theme instance.
  const theme = createMuiTheme({
    palette: {
      primary: green,
      accent: red,
      type: 'light',
    },
  });

  // STEP-1 CREATE A REDUX STORE ON THE SERVER
  const store = createStore(reducers, state, middleware);
  const sheetsRegistry = new SheetsRegistry();
  // Create a sheetsManager instance.
  const sheetsManager = new Map();
  const generateClassName = createGenerateClassName();
  // STEP-2 GET INITIAL STATE FROM THE STORE
  const initialState = JSON.stringify(store.getState()).replace(/<\/script/g, '<\\/script').replace(/<!--/g, '<\\!--');
  // STEP-3 IMPLEMENT REACT-ROUTER ON THE SERVER TO INTERCEPT CLIENT REQUESTs AND DEFINE WHAT TO DO WITH THEM
  const context = {};
  const reactComponent = renderToString(
    <JssProvider registry={sheetsRegistry} generateClassName={generateClassName}>
      <MuiThemeProvider theme={theme} sheetsManager={sheetsManager}>
        <Provider store={store}>
          <StaticRouter
            location={req.url}
            context={context}>
            {routes}
          </StaticRouter>
        </Provider>
      </MuiThemeProvider>
    </JssProvider>
  );
  const css = sheetsRegistry.toString()
  const reactMetaComponent = DocumentMeta.renderToStaticMarkup();
  if (context.url) {
    // can use the `context.status` that
    // we added in RedirectWithStatus
    redirect(context.status, context.url);
  } else {
    //https://crypt.codemancers.com/posts/2016-09-16-react-server-side-rendering/
    //res.status(200).render('index', { reactComponent, reactMetaComponent, initialState });
    fs.readFile(path.resolve('build/index.html'), 'utf8', (err, data) => {
      if (err) {
        return res.status(500).send('An error occurred')
      }
      const replacedData = data.replace(
        '<div id="root"></div>',
        `<div id="root">${reactComponent}</div>
        <style id="jss-server-side">${css}</style>
        <script>
          window.INITIAL_STATE = ${initialState}
        </script>`
      );
      const replacedMetaTagData = replacedData
        .replace(`<meta id="reactMetaTags"/>`,
          `${reactMetaComponent}`);
      res.send(replacedMetaTagData);
    })
  }
}

function handleRender(req, res) {
  const components = routesConfigs
    .filter(route => matchPath(req.path, route)) // filter matching paths
    .map(route => route.component); // check if components have data requirement
  let promiseObj = null;
  if (components.length > 0 && (components[0].fetchData instanceof Function)) {
    /* fetchData is the function defined in each component and make it like class 
       function and it will be called at server side
    */
    components[0]
      .fetchData(req.query)
      .then((response) => {
        renderView(req, res, response);
      })
      .catch((error) => {
        console.log('***--- handleRender error ', error);
        renderView(req, res, {});
      });
  } else {
    renderView(req, res, {});
  }
}

module.exports = handleRender;
  1. By default it will be executing a handleRender function in the above code. In the handleRender function, we read a routesConfig file which is just for keeping track of respective component for each route path.
    import LandingComponent from '../pages/landing/components/LandingComponent';
    import AboutComponent from '../pages/about/components/AboutComponent';
    export default [
      {
        path: "/",
        component: LandingComponent,
        exact: true,
      },
      {
        path: '/about',
        component: AboutComponent,
        exact: true,
      }
    ];
  2. routesConfigs will be used by requestHandler to find dynamically which component needs to be rendered for the request. It also checks for fetchData, if fetchData is defined by the component then requestHandler will invoke it which internally invokes api. Note here is all this is happening at server side not on the browser, component object is created in server and fetchData action will be invoked in server. You can see the brief description of fetchData and how to use this in the component in the next step.
  3. When renderView is called, every times it creates is own redux store and a material ui theme provider, thats why we follow this code(which is also mention in the above code snip). 
    const theme = createMuiTheme({
        palette: {
          primary: green,
          accent: red,
          type: 'light',
        },
      });
    
      // STEP-1 CREATE A REDUX STORE ON THE SERVER
      const store = createStore(reducers, state, middleware);
      const sheetsRegistry = new SheetsRegistry();
      // Create a sheetsManager instance.
      const sheetsManager = new Map();
      const generateClassName = createGenerateClassName();
  4. Next major step is reading a build/index.html file which you will get by running npm run build,
    Here we will be injecting the component created at server side into index.html.

    const replacedData = data.replace(
            '<div id="root"></div>',
            `<div id="root">${reactComponent}</div>
            <style id="jss-server-side">${css}</style>
            <script>
              window.INITIAL_STATE = ${initialState}
            </script>`
     );

    where in index.html of public folder should compulsory has this tag

    <div id="root"></div>
  5. For facebook sharing, when you share the url a image and the title and description of the page has to be displayed, for that all those content has to be in the meta tag inside the head tag, hence we need to replaced meta tag with server generated meta tag code. 
    const replacedMetaTagData = replacedData
      .replace(`<meta id="reactMetaTags"/>`,
      `${reactMetaComponent}`);

    Where in index.html of public folder, meta tag with id is should be unchanged

    <meta id="reactMetaTags"/>
  6. Finally we will serve the requested page with updated meta tags and updated html for the first rendering cycle it self. 
    res.send(replacedMetaTagData);


    Step 7

  7. Every component should define an action which will be invoked from server side script, however in server side the request handler will be a generic script and we have to dynamically invoke an action at server side, to achieve that, each component has to define an action and assign action function pointer to fetchData, fetchData is a static class variable kept in component. Check the below code snippet , fetchData is defined at AboutComponent class level and a pointer to action is assigned to it.
    AboutComponent.fetchData = fetchAboutData;
    export default connect(mapStateToProps, null)(AboutComponent);
    
  8. You can refer to the fetchAboutData action in the aboutActions.js which will make the API call to some server, for testing iI am using the JSON placeholder get API which will get the list of posts as response, refer the code below 
    import axios from 'axios';
    export const fetchAboutData = (params) => {
      return new Promise((resolve, reject) => {
        const url = 'https://jsonplaceholder.typicode.com/posts';
        axios
          .get(url)
          .then(response => {
            resolve({
              about: {
                posts: response.data
              }
            });
          })
          .catch((error) => {
            console.log('Error while fetching posts from network', error);
            reject(null);
          });
      });
    }
  9. In the positive view, it goes to then block(success block) of the axios api call, you can observe that it’s not direct resolve, its resolving a reducer named about and that contain the posts as one of the key, this set up has to be same in both client side reducer as well in axios call in order to use it component (About Component), Observe the below codes, I have shown the code snips of axios call, aboutReducer to mapStateToProps in AboutComponent,
    In axios call 

    resolve({
        about: {
           posts: response.data
        }
    });

    In about reducer 

    const INITIAL_STATE = {
    posts: []
    };

    In about component

    const mapStateToProps = (state) => {
        return {
           posts:state.about.posts
        };
    }
  10. So in the render method, you can access the posts array like this.props.posts, in the return method of render function i have written one more function which will return the list of posts(only title) and it creates a html code
    getAllPosts = () => {
       const postView = this.props.posts.map(post =>
       <li>{post.title}</li>
     );
     return postView;
    }
  11. Once the html is ready, then its in the success block of the fetchData function in the handleRender function of requestHandler file , then followed by the code it calls the renderView method along with data(html) returned from the component.

Step8 :
Update the package.json start script to point to server side rendering beginning of the file, thats www under bin directory. Now server side rendering is really ready. 

  "scripts": {
    "start": "node bin.www",

Step9 : Running project:

  1. In the requestHandler file we will be pointing to index.html inside the build folder, hence we need to generate a build from react by running the command 
    npm run build
  2. Run the start command of your script by
    npm run start

        OR

    nodemon

        OR 

    node bin/www
  3. Since we are running this project on 5000 port, run http://localhost:5000 which is just a page without requesting for API, you simply see as like below
  4. I have made one more component with calling API and printing the results on screen,  run http://localhost:5000/about . I am using an open dummy api for printing list of posts,
    Ie: https://jsonplaceholder.typicode.com/posts

The output picture is shown below

For View Tutorial on Server Side Rendering using ReactJS, Material-ui and Redux with explanation of each code snippet click here

An Example Source Code is in Github project Link : https://github.com/pilleanand/ssr-react16/tree/master/ssr-react-16

Common issues faced in React SSR Applications 

Posted by:

Anand S,

Software Engineer, Soczen Technologies Pvt Ltd,

Developer: https://sociallygood.com

ReactJS Server Side Rendering : Calling Web Services (APIs) From Server Side

A step by step guide to support server side rendering in reactjs : Calling Web Services (APIs) From Server Side

Before learning how to implement server side rendering in reactjs , let us know why server side rendering ?

Read Latest Post On Server Side Rendering with React16 + Material-UI 3.x : SSR with React16

Why Server Side Rendering ?

  1. Performance gain for initial page load : Server side rendering improves the performance of initial page load, this is because it reduces number of calls from client to server. Rather than loading empty page first, then call api , get the response then iterate the response to create ui components at client side, for server side rendering, many client-server calls will be removed and for the first render itself the client will get complete HTML with all the data filled. So the browser will just render quickly the final HTML. See the below image taken from Udemy tutorial on ReactJS, which gives complete flow diagram of client-server requires


Image Credit – Udemy Server Side Rendering React JS Flow Diagram

2. SEO friendly : Search Engine crawlers will look for server side rendering because it makes sense for crawlers to communicate with your server to get details of your page ?

3. Social Media Sharing: to get the preview of your page when some one share your page in social media like facebook, server side rendering is must, because facebook/twitter/g+ needs og tags to be filled for the first render itself

After knowing importance of server side rendering, let us explore how to enable it using reactjs.

Important Considerations while working on server side rendering

  1. In reactjs if you are dealing with server side rendering, then you should be aware that most of the component life cycle methods will not be called at server side. if you have to do some operations then you should either do it in component’s constructor or componentWillMount 
  2. And you should keep updating redux store from server side as well and give the updated store to client other wise client is unaware of what is changed in the store

How To Enable Server Side Rendering in React : Calling APIs from server side

Prerequisites for server side rendering in reactjs

  1. Having a nodejs middleware for request handling – if your client part is running on 8080 port and api’s are running on 8081 port, then all the requests coming to 8080 port, should go through this middleware. This is where server side api calls will be handled for every route.
  2. We need a Redux Action for API call which will just return a promise – note here is that, this should not dispatch the state, since its called from server side, the dispatch doesn’t make any sense here.
  3. Static function pointer in a component to redux action -> function pointer will be used to call action from server side
  4. Creating redux store at server side to update the data
  5. Keeping a global state and including it in view ( index.ejs or index.pug whichever view engine you use)

Let us see how to implement server side rendering with reactjs

Define request handler middleware in your app.js : this is where we call apis from backend , observe and understand how we call api for respective route. this is common middleware for all routes, but calling right API for respective route is happening due to routesConfig and static function pointer defined in respective component of routes. To understand this completely check how fetchData function is being used in function handleRender(req, res) and NewsDetailComponent

//App.js

// REQUEST HANDLER FOR SERVER-SIDE RENDERING
const requestHandler = require('./requestHandler');
// requestHandler.js

'use strict';

import React from 'react';
import { Provider } from 'react-redux';
import { createStore } from 'redux';
import { renderToString } from 'react-dom/server';
import { StaticRouter, matchPath } from 'react-router-dom';

//Reducers combiner 
import reducers from '../src/client/reducers/index';

//All the routes defined 
import routes from '../src/routes';

// Routes config which just has path and respective component mapping
import routesConfigs from '../src/routesConfig';


import DocumentMeta from 'react-document-meta';

//A Wrapper for axios where actual api call happens
import { HTTPRequestHandler } from '../src/util/commonRequires';


function renderView(req, res, state) {
    // STEP-1 CREATE A REDUX STORE ON THE SERVER
    const store = createStore(reducers, state);

  // STEP-2 GET INITIAL STATE FROM THE STORE
  const initialState = JSON.stringify(store.getState()).replace(/<\/script/g, '<\\/script').replace(/<!--/g, '<\\!--');
  // STEP-3 IMPLEMENT REACT-ROUTER ON THE SERVER TO INTERCEPT CLIENT REQUESTs AND DEFINE WHAT TO DO WITH THEM
  const context = {};
  const reactComponent = renderToString(
    <Provider store={store}>
      <StaticRouter
        location={req.url}
        context={context}>
        {routes}
      </StaticRouter>
    </Provider>
  );
  const reactMetaComponent = DocumentMeta.renderToStaticMarkup();

  if (context.url) {
    // can use the `context.status` that
    // we added in RedirectWithStatus
    redirect(context.status, context.url);
  } else {
    //https://crypt.codemancers.com/posts/2016-09-16-react-server-side-rendering/
    res.status(200).render('index', { reactComponent, reactMetaComponent, initialState });
  }
}
function handleRender(req, res) {
  const components = routesConfigs
    .filter( route => matchPath( req.path, route ) ) // filter matching paths
    .map( route => route.component ); // check if components have data requirement
    let promiseObj = null;    
    if (components.length > 0 && (components[0].fetchData instanceof Function)) {
      components[0]
      .fetchData(req.query)
      .then((response) => {
        //console.log('***--- response ', response);
          renderView(req, res, response);
      })
      .catch((error) => {
        console.log('***--- error ', error);
        renderView(req, res, {});
      });
    } else {
      renderView(req, res, {});
    }
}

module.exports = handleRender;

Check the view part and the most important part because this is where the global redux stare is being shared by client and server
// View Part : index.ejs 
// put below lines of code within the <body> tag

<DIV class = 'appStyle' id="app"><%-reactComponent-%></DIV>
<script>window.INITIAL_STATE=<%- initialState -%></script>


Now let us define a component which embed all the routes

// PrimaryLayout.js

import React from 'react';
import { Route, Switch } from 'react-router-dom';
import DocumentMeta from 'react-document-meta';

import MenuComponent from '../components/common/elements/menu';
import NewsDetailComponent from '../components/pages/NewsDetailComponent';

import {
  NEWS
} from '../../constants';


class PrimaryLayout extends React.Component {
  render() {
    const layoutPath = this.props.match.path;
    return (
      <div style={{ paddingTop: 80 }}>
        <MenuComponent />
        <main>
          <Switch>
            <Route exact path={layoutPath} component={LandingPageComponent} />
            <Route exact path={`${layoutPath}${NEWS}/:newsId`} component={NewsDetailComponent} />
          </Switch>
        </main>
      </div>
    );
  }
}

export default PrimaryLayout;


Now let us define all routes

//routes.js

'use strict';
// REACT
import React from 'react';

// REACT-ROUTER
//import {Router, Route, IndexRoute, browserHistory} from 'react-router';
import { Route, Switch } from 'react-router-dom';

import getMuiTheme from 'material-ui/styles/getMuiTheme';
import { MuiThemeProvider } from 'material-ui/styles';

import PrimaryLayout from './client/containers/PrimaryLayout';


// RETRIVES COMPONENTS BASED ON STATUS
const Status = function ({ code, children }) {
  return (
        <Route
          render={function ({ staticContext }) {
            if (staticContext) {
              staticContext.status = code;
            }
            return children;
          }}
        />
    );
};

//NOT-FOUND COMPONENT
const NotFound = function () {
    return (
      <Status code={404}>
        <div>
          <h2> Sorry, can’t find this page</h2>
        </div>
      </Status>
    );
};

// CLIENT-SERVER SHARED ROUTES
const routes = (
  <MuiThemeProvider muiTheme={getMuiTheme('lightBaseTheme')}>
      <div className='appStyle'>
          {/*
            switch required to handle inclusive rendering,
            example : two different paths like /about /:userName both
            will render both the components switch handles such requests by
            inclusively rendering the specific component
         */}
          <Switch>
            <Route path="/notfound" component={NotFound} />
            <Route path="/" component={PrimaryLayout} />
          </Switch>
      </div>
    </MuiThemeProvider>
    );

export default routes;


and let us use the routes

// client.js which defines routes 

'use strict';
// REACT
import React from 'react';
import { render } from 'react-dom';
import { Provider } from 'react-redux';
// REACT-ROUTER
import { BrowserRouter } from 'react-router-dom';
//import {Router, Route, IndexRoute, browserHistory} from 'react-router';

import { applyMiddleware, createStore } from 'redux';
import logger from 'redux-logger';
import thunk from 'redux-thunk';
import routes from '../routes';


// IMPORT COMBINED REDUCERS
import reducers from './reducers/index';
// STEP 1 create the store
const middleware = applyMiddleware(thunk, logger);
// WE WILL PASS INITIAL STATE FROM SERVER STORE
const initialState = window.INITIAL_STATE;
const store = createStore(reducers, initialState, middleware);

const Routes = (
  <Provider store={store}>
    {/*
      Provider
      Makes the Redux store available to the connect() calls in the component hierarchy below.
      Normally, you can’t use connect() without wrapping a parent or ancestor
      component in
   */}
    {/*
      A <Router> that uses the HTML5 history API (pushState, replaceState and the popstate event)
      to keep your UI in sync with the URL.
    */}
    <BrowserRouter>
      {routes}
    </BrowserRouter>
  </Provider>
);

render(
  Routes, document.getElementById('app')
);


New Let us define our component

'use strict';
import React from 'react';
import {connect} from 'react-redux';

import { fetchNews, fetchNewsData } from '../actions/newsActions';

 class NewsDetailComponent extends React.Component {
    constructor(props) {
      super(props);
    }
    
    componentDidMount() {
        this.props.fetchNews(this.props.match.params.eventId);
    }
    render() {
        return(
            <div className='container-fluid'>
                <section>
                    <div className='row'>
                        <div className='col-lg-2 col-md-2 col-sm-2 col-xs-1'></div>
                        <div className='col-lg-8 col-md-8 col-sm-8 col-xs-10'>
                           {/* here your news component */} 
                        </div>
                        <div className='col-lg-2 col-md-2 col-sm-2 col-xs-1'></div>
                    </div>
                </section>
            </div>
        );
    }
 }


function mapStateToProps(state) {
    return {
        newsInfo: state.newsInfo.newsInfo
    };
}
NewsDetailComponent.fetchData = fetchNewsData;
export default connect(mapStateToProps, {
    fetchNews,
})(NewsDetailComponent);

And redux action which calls API

export const fetchNewsData = (params) => {
    return new Promise((resolve, reject) => {
        const newsDetailsUrl = `${NEWS_API_PATH}/${params.newsId}?newsId=${newsId}`;
        HTTPRequestHandler
        .get(newsDetailsUrl)
        .then((apiResponse) => {
            / * 
                Return the updated state so that we can update redux state 
                from server side
            */
            resolve({
                    news: { 
                        news: { 
                            newsDetails: apiResponse.data.newsDetails,
                        } 
                    }
                  });
            
        })
        .catch((apiError) => {
            console.log('-- 2 api call fail--- ', apiError);
            reject(null);
        });
    });
}


Rather than explaining each line of code written, I would like to help you to understand it by taking your attention on important aspects 

  1. to understand how the redux state is managed from backend and available for front end ( UI component, NewsDetailComponent) check how initialState and window.INITIAL_STATE are being used 
  2. to understand how api is called in a common middleware requestHandler at server side for respective page please check how routesConfig , fetchData, fetchNewsData are being used 
  3. to understand how redux store is managed even at server side and synched with client side which is most important – other wise client is unaware of what happened at server side – check function renderView(req, res, state) (server side) and client.js (client side) both are creating redux store but the data from server is being used by client using a global store object.

References : 

https://medium.freecodecamp.org/demystifying-reacts-server-side-render-de335d408fe4

http://sujinc.com/2018/06/20/all-about-sujinc-com-part-1-reactjs-ssr/


Server Sent Events (SSE) using Jersey, spring and Javascript

Server Side Event not firing in Jersey 2.8 using SSE

Notifications were playing a major role in every applications either it is a mobile application or web application or even a desktop application. These days every latest Operating system updates were including Facebook as a service within OS itself and mail notifications were just on your desktop.

It is important to learn how to support realtime notifications in your web applications. Following technologies were considered in the given example

Springs

Jersey2.8

Javascript

Server Sent Events Javascript Code

Register to Server Sent Events in Javascript


var notificationBaseURL =  "http://myapplication.com/"; //The URL Where your services are hosted
function listenAllEvents() {
	if (typeof (EventSource) !== "undefined") {

		var source = new EventSource(
				notificationBaseURL+"applicationnotifier/sse/events/register/"+loggedInUserName);
		source.onmessage = notifyEvent;
	} else {
		console.log("Sorry no event data sent - ");
	}
}

function notifyEvent(event) {
	var responseJson = JSON.parse(event.data);
	alert("... Notification Received ...");
}

In the above code the URL is specific to user who have logged in. Every user has to register for notification.

Java Spring Code For Server Sent Events(SSE):


//    NotificationHandler.java

package com.applicationnotifier.Notification.WebServices.Impl;

import java.io.IOException;
import java.util.ArrayList;
import java.util.HashMap;
import java.util.List;
import java.util.Map;

import javax.inject.Singleton;
import javax.ws.rs.Consumes;
import javax.ws.rs.FormParam;
import javax.ws.rs.GET;
import javax.ws.rs.POST;
import javax.ws.rs.Path;
import javax.ws.rs.PathParam;
import javax.ws.rs.Produces;
import javax.ws.rs.core.MediaType;

import org.codehaus.jackson.map.ObjectMapper;
import org.codehaus.jettison.json.JSONObject;
import org.glassfish.jersey.media.sse.EventOutput;
import org.glassfish.jersey.media.sse.OutboundEvent;
import org.glassfish.jersey.media.sse.SseBroadcaster;
import org.glassfish.jersey.media.sse.SseFeature;
import org.slf4j.Logger;
import org.slf4j.LoggerFactory;
import org.springframework.beans.factory.annotation.Autowired;
import org.springframework.beans.factory.annotation.Qualifier;
import org.springframework.web.bind.annotation.ResponseBody;

import com.applicationnotifier.Notification.framework.impl.NotificationFrameworkFactory;
import com.applicationnotifier.Notification.framework.intf.NotificationFrameworkInterface;
import com.applicationnotifier.dao.notification.NotificationDao;
import com.applicationnotifier.pojo.Form;
import com.applicationnotifier.pojo.notification.Notification;
import com.applicationnotifier.responsepojo.NotificationResponse;

/*
    A CLASS THAT REGISTERS NOTIFICATIONS
    Registering does following functions
    1. Create a broadcaster object for each notification type
    2. Map Event Output object for each broadcaster to broadcast a message
    3. Broadcast the event
 */

@Singleton
@Path("/events")
public class NotificationHandler {
	
	final static Logger logger = LoggerFactory.getLogger(NotificationHandler.class);
	@Autowired
	@Qualifier("notificationDaoImpl")
	NotificationDao notificationDao;

    /*
        A map thats keeps track of each notification and its output event object. broadcaster object.
        SseBroadcaster will perform broadcasting the notification
     */
	Map<String, SseBroadcaster> notificationBroadcasterMap = new HashMap<String, SseBroadcaster>();

    
    /*
     registerForAnEventSummary: will be called when the client registers for notifications
     in javascript we call listenAllEvents() method.
     */
	@Path("/register/{userName}")
	@Produces(SseFeature.SERVER_SENT_EVENTS)
	@GET
	public @ResponseBody EventOutput registerForAnEventSummary(
			@PathParam("userName") String userName) {
		try {
			NotificationFrameworkFactory factory = new NotificationFrameworkFactory();
			
			EventOutput eventOutput = new EventOutput();
			

            /* Returns all types of notifications, for each type of notification there should be an implementation as newMessageNotificationImplementation or newMessageNotificationFramework
             
                Exmple  newMessageNotification, in this example this notification has a class
                newMessageNotificationFramework.java
             
             */
			List notificationTypes = getAllNotificationTypes();

			for (String notificationType : notificationTypes) {
				NotificationFrameworkInterface notificationInterface = factory
						.getNotifieir(notificationType);
				String keyVal = getKeyVal(notificationType, userName);
				if (!notificationBroadcasterMap.containsKey(keyVal)) {
                    //Add broadcaster to map
					notificationBroadcasterMap.put(keyVal,
							notificationInterface.getBroadcaster());
				}
				
                //Get broadcaster and add event output
				notificationBroadcasterMap.get(keyVal).add(eventOutput);
			}

			return eventOutput;
		} catch (NullPointerException exception) {
			logger.error("Exception Occurred: ", exception);
		}
		return null;
	}

    /*
     getKeyVal : every user must register for each notification
                Notification Key : newMessageNotification_Ram indicates Ram is listening to newMessage notification
     */
	private String getKeyVal(String typeOfEvent, String userName) {

		switch (typeOfEvent) {
		case "newMessageNotification":
        case "likeNotification":
        case "commentNotification":
			return typeOfEvent + "_" + userName;
        		
		default:
			return null;
		}
	}

    //Return different types of notifications supported in your application
	private List getAllNotificationTypes() {
		List notificationTypes = new ArrayList();
		notificationTypes.add("newMessageNotification");
		notificationTypes.add("likeNotification");
		notificationTypes.add("commentNotification");
		return notificationTypes;
	}

    /*
        Just returns a Map object for a given json string
     */
	@SuppressWarnings("unchecked")
	protected HashMap<String, String> getMapFromJson(String message) {
		ObjectMapper mapper = new ObjectMapper();
		HashMap<String, String> value = null;
		try {
			value = mapper.readValue(message, HashMap.class);
		} catch (IOException e) {
			logger.error("Exception Occurred: ", e);
		}
		return value;
	}

    /*
        Broad cast notification to all clients which are registered for notification
     */
	@Path("/broadcast")
	@POST
	@Produces(MediaType.TEXT_PLAIN)
	@Consumes(MediaType.APPLICATION_FORM_URLENCODED)
	public String broadcastNotifications(@FormParam("message") String message) {

		try {
			HashMap<String, String> value = getMapFromJson(message);
			JSONObject responseJson = new JSONObject(value);
			/*
			 * System.out .println("received data: " + message);
			 */
			OutboundEvent.Builder eventBuilder = new OutboundEvent.Builder();
			OutboundEvent event = eventBuilder.name("message")
					.mediaType(MediaType.TEXT_PLAIN_TYPE)
					.data(String.class, responseJson.toString()).build();

            //Things you wish to send to client
			String keyVal = getKeyVal(value.get("ntftyp"),
                                      , value.get("un"));
			System.out.println("broadcasting: " + message + " to: " + keyVal);
			if (notificationBroadcasterMap.get(keyVal) != null) {
				// System.out.println("message is ready for broadcasting");
				notificationBroadcasterMap.get(keyVal).broadcast(event);
			} else
				System.out.println("no broadcaster for: " + keyVal);
		} catch (NullPointerException exception) {
			logger.error("Exception Occurred: ", exception);
		}

		return "Message '" + message + "' has been broadcast.";
	}
}


// NewMessageNotificationBusniessIntf.java

package com.applicationnotifier.Notification.business.intf;

import java.util.HashMap;
import java.util.Map;

import com.applicationnotifier.Notification.framework.impl.NotificationAbstractFramework;

public abstract class NewMessageNotificationBusniessIntf extends NotificationAbstractFramework {
    public boolean notifyNewMessage(HashMap<String, Object> message);
}


// NewMessageNotificationBusniessImpl.java
package com.applicationnotifier.Notification.business.impl;

import java.io.BufferedReader;
import java.io.InputStreamReader;
import java.util.HashMap;
import java.util.Map;
import java.util.ResourceBundle;

import org.apache.commons.httpclient.HttpClient;
import org.apache.commons.httpclient.NameValuePair;
import org.apache.commons.httpclient.methods.PostMethod;
import org.slf4j.Logger;
import org.slf4j.LoggerFactory;
import org.springframework.beans.factory.annotation.Autowired;
import org.springframework.beans.factory.annotation.Qualifier;
import org.springframework.stereotype.Service;

import com.applicationnotifier.Notification.business.intf.NewMessageNotificationBusniessIntf;

/*
    Call these methods when some updates happened in your Database
    Example - Some one sent a message, the messageInsert service will be called (Spring Controller,Service,Repository ) 
    in Service layer create object of NewMessageNotificationBusniessImpl and call these methods to notify
 
    In these methods just call Post/Get methods , these methods are services for your notifications
        URL - sse/events/broadcast/
 
    Any call to sse/events/broadcast/ will call a method defined in NotificationHandler class i.e broadcastNotifications
 */
@Service
public class NewMessageNotificationBusniessImpl extends
		NewMessageNotificationBusniessIntf {
	
    @Override
	public boolean notifyNewMessage(HashMap<String, Object> message) {
		try {
			message.put("msg", message.get("un") + " You have new message ");
			HttpClient httpClient = new HttpClient();

			PostMethod postMethod = null;
            postMethod = new PostMethod(
                    resourceBundle.getString("localhost:8080")
                            + resourceBundle.getString("applicationnotifier")
                            + resourceBundle
                                    .getString("sse/events/broadcast/"));
			
			// postMethod.addParameter(data[0]);
			NameValuePair[] parametersBody = {
					new NameValuePair("message", convertToJson(message)),
					};
			postMethod.setRequestBody(parametersBody);
			httpClient.executeMethod(postMethod);

			BufferedReader responseReader = new BufferedReader(
					new InputStreamReader(postMethod.getResponseBodyAsStream()));
			String line;
			while ((line = responseReader.readLine()) != null) {
				System.out.println(line);
			}
						
			return true;
		} catch (Exception e) {
			logger.error("Exception Occurred: ", e);
		}
		return false;
	}
}


//NotificationAbstractFramework.java
package com.applicationnotifier.Notification.framework.impl;

import java.io.IOException;
import java.util.Map;

import org.codehaus.jackson.map.ObjectMapper;
import org.slf4j.Logger;
import org.slf4j.LoggerFactory;

public abstract class NotificationAbstractFramework {
	
	final static Logger logger = LoggerFactory.getLogger(NotificationAbstractFramework.class);

	protected String convertToJson(Map<String, Object> message) {
		try {
			ObjectMapper mapper = new ObjectMapper();
			return mapper.writeValueAsString(message);
		} catch (IOException e) {
			logger.error("Exception Occurred: ", e);
		}
		return "";
	}
}


Amazon AWS EC2 Security Group and S3 Bucket Configuration

Amazon AWS EC2  Security Group and S3 Bucket configuration

Read our previous post : How to Create And Configure Amazon EC2 Free tier account

Amazon AWS is an awesome cloud service, It is worth writing a post on AWS service and its usage.

It is very easy to create an AWS account and use it, but most people will struck when its matter of security. Amazon setup is little bit complicated for security configuration. Please follow the steps given below to enable security group in your amazon cloud service.

Steps For Amazon EC2 Security Group:

Step 1: Go to your EC2 Service as shown in the image below

EC2
EC2

Step 2: Go to the section Security Group

Amazon Security Group


Step 3: Enter Group Details 

Amazon Security group details


Step 4: Add following rules 

Inbound

  • Rule 1

 Type : HTTP

 Protocol : TCP

 Port Range : 80

 Source : 0.0.0.0/0

  • Rule 2

 Type : All traffic

 Protocol : All traffic

 Port Range : All traffic

 Source : Your Ip Address ( search in google What Is My IP, copy paste the same IP here )

  • Rule 3

 Type : SSH

 Protocol : TCP

 Port Range : 22

 Source : Your Security Group Id

  • Rule 4

 Type : MYSQL

 Protocol : TCP

 Port Range : Mysql port ( 3306 )

 Source : Your Security Group Id

Outbound

  • Rule 1

 Type : HTTP

 Protocol : TCP

 Port Range : 80

 Source : 0.0.0.0/0

  • Rule 2

 Type : All traffic

 Protocol : All traffic

 Port Range : All traffic

 Source : Your Ip Address ( search in google What Is My IP, copy paste the same IP here )

  • Rule 3

 Type : MYSQL

 Protocol : TCP

 Port Range : Mysql port ( 3306 )

 Source : Your Security Group Id

Amazon S3 Bucket configuration

Step 1 : Go to Administration and Security from Amazon Services

Amazon S3 : IAM
Amazon S3 : IAM


Step 2 : Select Group from the IAM page

Step 3: Create new group, Give any name for the group

Step 4: The most important step is to set Policy type for the S3 bucket.

For file upload/download, Select AmazonEC2FullAccess

If this is done then your Amazon S3 is ready for use.

Step 5: Go to S3 service from the main menu

There create new bucket. Set permissions to your bucket as per your need.

File Upload to Amazon S3 bucket in Java 

Code Sample :

private static String bucketName = “”; //Give your YourS3Bucket name
private static String keyName = “”; // Give SomeKey

public final static String FOLDER_PATH = “TestFolder”;

public final static String rootServerURL = “”; //Your S3 Bucket Path => Your Amazon Instance / BucketName

BasicAWSCredentials awsCreds = new BasicAWSCredentials(“AccessKey”, “SecretKey”);

AmazonS3 s3client = new AmazonS3Client(awsCreds);

PutObjectRequest putObjectRequest = new PutObjectRequest(bucketName, keyName, fileObject);
putObjectRequest.withCannedAcl(CannedAccessControlList.PublicRead); // Read Permission for all
s3client.putObject(putObjectRequest);