Amazon AWS RDS Failed to Connect to MySQL at with user using MySql Workbench

When trying to connect to Amazon AWS RDS from local machine using MySql Workbench , if you face connection issue like error: Failed to Connect to MySQL at with user Kindly follow below steps

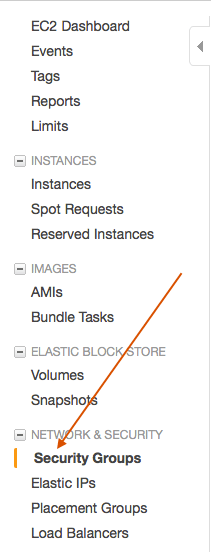
Follow setting up security group : Refer

Then set public access try by following these steps

To change the Publicly Accessible property of the Amazon RDS instance to Yes:

1.    Verify that your VPC has an internet gateway attached to it and that the inbound rules for the security group allow connections.

2.    Open the Amazon RDS console.

3.    Choose Databases from the navigation pane, and then select the DB instance.

4.    Choose Modify.

5.    Under Network & Security, choose Yes for Public accessibility.

6.    Choose Continue.

7.    Choose Modify DB Instance.

DB Import Error due to Triggers :

ERROR 1419 (HY000) at line 918: You do not have the SUPER privilege and binary logging is enabled (you might want to use the less safe log_bin_trust_function_creators variable)

To fix this issue follow steps

  1. Open the RDS web console.
  2. Open the “Parameter Groups” tab.
  3. Create a new Parameter Group. On the dialog, select the MySQL family compatible to your MySQL database version, give it a name and confirm. Select the just created Parameter Group and issue “Edit Parameters”.
  4. Look for the parameter ‘log_bin_trust_function_creators’ and set its value to ’1′.
  5. Save the changes.
  6. Open the “Instances” tab. Expand your MySQL instance and issue the “Instance Action” named “Modify”.
  7. Select the just created Parameter Group and enable “Apply Immediately”
  8. Click on “Continue” and confirm the changes.
  9. Wait for the “Modifying” operation to be completed.
  10. Again, open the “Instances” tab. Expand your MySQL instance and
  11. expand “Instance Action” tab and select “Reboot”.

Amazon AWS EC2 Security Group and S3 Bucket Configuration

Amazon AWS EC2  Security Group and S3 Bucket configuration

Read our previous post : How to Create And Configure Amazon EC2 Free tier account

Amazon AWS is an awesome cloud service, It is worth writing a post on AWS service and its usage.

It is very easy to create an AWS account and use it, but most people will struck when its matter of security. Amazon setup is little bit complicated for security configuration. Please follow the steps given below to enable security group in your amazon cloud service.

Steps For Amazon EC2 Security Group:

Step 1: Go to your EC2 Service as shown in the image below

EC2
EC2

Step 2: Go to the section Security Group

Amazon Security Group


Step 3: Enter Group Details 

Amazon Security group details


Step 4: Add following rules 

Inbound

  • Rule 1

 Type : HTTP

 Protocol : TCP

 Port Range : 80

 Source : 0.0.0.0/0

  • Rule 2

 Type : All traffic

 Protocol : All traffic

 Port Range : All traffic

 Source : Your Ip Address ( search in google What Is My IP, copy paste the same IP here )

  • Rule 3

 Type : SSH

 Protocol : TCP

 Port Range : 22

 Source : Your Security Group Id

  • Rule 4

 Type : MYSQL

 Protocol : TCP

 Port Range : Mysql port ( 3306 )

 Source : Your Security Group Id

Outbound

  • Rule 1

 Type : HTTP

 Protocol : TCP

 Port Range : 80

 Source : 0.0.0.0/0

  • Rule 2

 Type : All traffic

 Protocol : All traffic

 Port Range : All traffic

 Source : Your Ip Address ( search in google What Is My IP, copy paste the same IP here )

  • Rule 3

 Type : MYSQL

 Protocol : TCP

 Port Range : Mysql port ( 3306 )

 Source : Your Security Group Id

Amazon S3 Bucket configuration

Step 1 : Go to Administration and Security from Amazon Services

Amazon S3 : IAM
Amazon S3 : IAM


Step 2 : Select Group from the IAM page

Step 3: Create new group, Give any name for the group

Step 4: The most important step is to set Policy type for the S3 bucket.

For file upload/download, Select AmazonEC2FullAccess

If this is done then your Amazon S3 is ready for use.

Step 5: Go to S3 service from the main menu

There create new bucket. Set permissions to your bucket as per your need.

File Upload to Amazon S3 bucket in Java 

Code Sample :

private static String bucketName = “”; //Give your YourS3Bucket name
private static String keyName = “”; // Give SomeKey

public final static String FOLDER_PATH = “TestFolder”;

public final static String rootServerURL = “”; //Your S3 Bucket Path => Your Amazon Instance / BucketName

BasicAWSCredentials awsCreds = new BasicAWSCredentials(“AccessKey”, “SecretKey”);

AmazonS3 s3client = new AmazonS3Client(awsCreds);

PutObjectRequest putObjectRequest = new PutObjectRequest(bucketName, keyName, fileObject);
putObjectRequest.withCannedAcl(CannedAccessControlList.PublicRead); // Read Permission for all
s3client.putObject(putObjectRequest);